


Splinting For Hand Therapy
Splinting For Hand Therapy
Published 9/2024
MP4 | Video: h264, 1920x1080 | Audio: AAC, 44.1 KHz
Language: English | Size: 1.09 GB | Duration: 0h 32m
Published 9/2024
MP4 | Video: h264, 1920x1080 | Audio: AAC, 44.1 KHz
Language: English | Size: 1.09 GB | Duration: 0h 32m
Improve your Technique without Patterns
What you'll learn
Learn one general idea for any type of splint
How to splint faster
Splint with common household materials
Splinting with or without patterns
Requirements
No experience needed
Description
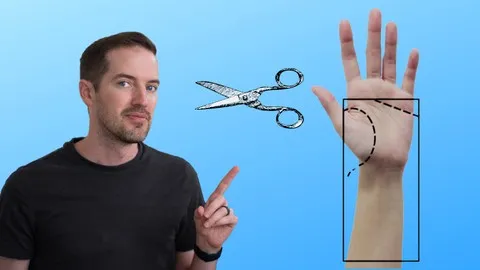
When I started working in hand therapy, I had very little experience with splinting. I learned how to make a couple splints in OT school, and I had practiced making the splints with my fieldwork educator, but Ididn't feel comfortable, and I never felt like patterns helped. After I started my first job in hand therapy, I had a hand therapist train me on how to splint without patterns. I was surprised how much easier it was to splint with this technique. After learning just a few tips,I felt comfortable making splints, and I was able to make them 4 times faster than before. I understand that watching a videois not as good as a hands on approach, but hopefully this shortcourse will help you to quickly develop your splinting skills as ahand therapist. When you splint with patterns you don't visualize the final product. Instead, you rely on apattern and splint accordingly. This takes time and results in error, because every hand size is different. Splinting without patterns is about visualization. Instead of focusing on how to copy thepattern, visualize what the end product will look like and what itwill prevent. If you're splinting for carpal tunnel, you want the wrist extended to about 15º with the digitsfree. A patient with a carpal tunnel splint should be able to use their hand without bending their wrist. Try to visualize the splint and also the function of the splint. When you start thinking this way, you no longer need to rely on patterns.In this video, I've provided afew patterns as a basis to help you get started. Thesepatterns are for the sole purpose of helping you understand whatthe final product should look like. You'll find that your initialsplinting material is always a rectangle and your final productfollows the shape and function of what you are attempting toaccomplish.
Overview
Section 1: Splinting
Lecture 1 Why you need to splint faster and how to do it
Lecture 2 Splinting the wrist, digits, and fingers
Lecture 4 Hand Creases are the Landmarks for Splinting
Lecture 5 Considerations for Splinting
Lecture 0 Welcome to the course
Hand Therapists,Physical Therapists,Hand Therapists